Article Information
- Posted By : Samar Patil
- Posted On : Jul 09, 2020
- Views : 1475
- Category : Predictive and Prescriptive Modeling » Machine Learning
- Description : Detecting blood cells using darknet yolov3
Overview
What is YOLO?
YOLO is a state-of-the-art object detection system. It is used to detect objects in an image and also draw a bounding box around the object. In other object detection systems like Fast RCNN & Faster RCNN, separate networks are used to detect the objects and predict the bounding boxes whereas in YOLO, a single convolutional network predicts the bounding boxes and the class probabilities for these boxes, hence the name You Only Look Once.The original yolo research paper is available here https://pjreddie.com/media/files/papers/yolo.pdf
YOLO is originally implemented in darknet which is an open source neural network framework written in C and CUDA. Later, it is implemented in other libraries like keras, pytorch, tensorflow. In this article, we will see how to train yolo darknet on a custom dataset. The following process is implemented in google colab which is useful as it provides free GPU and also to avoid the hassle of several installations and setups.
Anchor boxes
Anchor boxes are used to help the model in drawing the bounding boxes around each object. YOLO divides an entire image into grids. Sometimes a single image may contain more than one object to detect. By default, 5 anchor boxes are used which means the model detects a maximum of 5 objects in each grid.
The dataset can be downloaded from here:
Images: https://github.com/Shenggan/BCCD_Dataset/tree/master/BCCD/JPEGImages
Original Annotations: https://github.com/Shenggan/BCCD_Dataset/tree/master/BCCD/AnnotationsYOLO Format Annotations: https://github.com/DatascienceAuthority/Bloodcells-Detection-YOLOV3/tree/master/annotations-yolo
This is a dataset for blood cells detection(RBC, WBC, Platelets). It contains 2 folders - Images folder and annotations folder which consists of bounding box values for objects in each image in xml format. Our goal here is to train the model to detect WBC in an image.
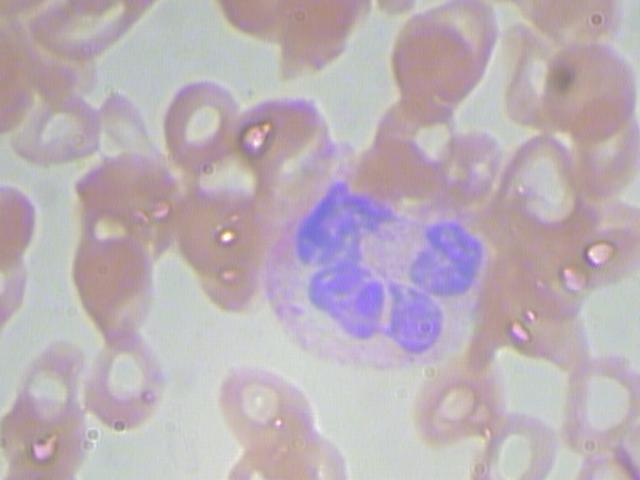
Consider the first image ‘BloodImage_00000.jpg’, its corresponding annotation file is in annotations folder ‘BloodImage_00000.xml’. The xml file has the locations of all RBC, WBC, Platelets present in that image in the following format,
Original Image:
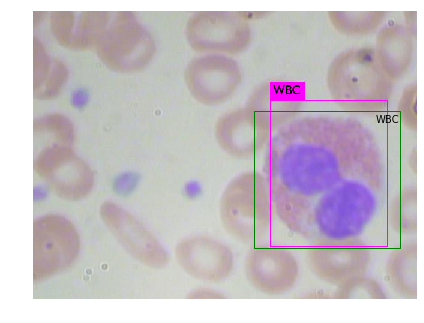
Few Annotations of Above Image :
Gist: https://gist.github.com/DatascienceAuthority/3a5f7d75583f55b73bd9f629f1e9860a
<annotation>
	<folder>JPEGImages</folder>
	<filename>BloodImage_00000.jpg</filename>
	<path>/home/pi/detection_dataset/JPEGImages/BloodImage_00000.jpg</path>
	<source>
		<database>Unknown</database>
	</source>
	<size>
		<width>640</width>
		<height>480</height>
		<depth>3</depth>
	</size>
	<segmented>0</segmented>
	<object>
		<name>WBC</name>
		<pose>Unspecified</pose>
		<truncated>0</truncated>
		<difficult>0</difficult>
		<bndbox>
			<xmin>260</xmin>
			<ymin>177</ymin>
			<xmax>491</xmax>
			<ymax>376</ymax>
		</bndbox>
	</object>
	<object>
		<name>RBC</name>
		<pose>Unspecified</pose>
		<truncated>0</truncated>
		<difficult>0</difficult>
		<bndbox>
			<xmin>78</xmin>
			<ymin>336</ymin>
			<xmax>184</xmax>
			<ymax>435</ymax>
		</bndbox>
	</object>
	<object>
		<name>RBC</name>
		<pose>Unspecified</pose>
		<truncated>0</truncated>
		<difficult>0</difficult>
		<bndbox>
			<xmin>63</xmin>
			<ymin>237</ymin>
			<xmax>169</xmax>
			<ymax>336</ymax>
		</bndbox>
	</object>
	<object>
		<name>RBC</name>
		<pose>Unspecified</pose>
		<truncated>0</truncated>
		<difficult>0</difficult>
		<bndbox>
			<xmin>214</xmin>
			<ymin>362</ymin>
			<xmax>320</xmax>
			<ymax>461</ymax>
		</bndbox>
	</object>
	<object>
		<name>RBC</name>
		<pose>Unspecified</pose>
		<truncated>0</truncated>
		<difficult>0</difficult>
		<bndbox>
			<xmin>414</xmin>
			<ymin>352</ymin>
			<xmax>506</xmax>
			<ymax>445</ymax>
		</bndbox>
	</object>
	<object>
		<name>RBC</name>
		<pose>Unspecified</pose>
		<truncated>1</truncated>
		<difficult>0</difficult>
		<bndbox>
			<xmin>555</xmin>
			<ymin>356</ymin>
			<xmax>640</xmax>
			<ymax>455</ymax>
		</bndbox>
	</object>
	<object>
		<name>RBC</name>
		<pose>Unspecified</pose>
		<truncated>1</truncated>
		<difficult>0</difficult>
		<bndbox>
			<xmin>469</xmin>
			<ymin>412</ymin>
			<xmax>567</xmax>
			<ymax>480</ymax>
		</bndbox>
	</object>
	<object>
		<name>RBC</name>
		<pose>Unspecified</pose>
		<truncated>1</truncated>
		<difficult>0</difficult>
		<bndbox>
			<xmin>1</xmin>
			<ymin>333</ymin>
			<xmax>87</xmax>
			<ymax>437</ymax>
		</bndbox>
	</object>
	<object>
		<name>RBC</name>
		<pose>Unspecified</pose>
		<truncated>1</truncated>
		<difficult>0</difficult>
		<bndbox>
			<xmin>4</xmin>
			<ymin>406</ymin>
			<xmax>95</xmax>
			<ymax>480</ymax>
		</bndbox>
	</object>
	<object>
		<name>RBC</name>
		<pose>Unspecified</pose>
		<truncated>0</truncated>
		<difficult>0</difficult>
		<bndbox>
			<xmin>155</xmin>
			<ymin>74</ymin>
			<xmax>247</xmax>
			<ymax>174</ymax>
		</bndbox>
	</object>
	<object>
		<name>RBC</name>
		<pose>Unspecified</pose>
		<truncated>0</truncated>
		<difficult>0</difficult>
		<bndbox>
			<xmin>11</xmin>
			<ymin>84</ymin>
			<xmax>104</xmax>
			<ymax>162</ymax>
		</bndbox>
	</object>
	<object>
		<name>RBC</name>
		<pose>Unspecified</pose>
		<truncated>0</truncated>
		<difficult>0</difficult>
		<bndbox>
			<xmin>534</xmin>
			<ymin>39</ymin>
			<xmax>639</xmax>
			<ymax>139</ymax>
		</bndbox>
	</object>
	<object>
		<name>RBC</name>
		<pose>Unspecified</pose>
		<truncated>1</truncated>
		<difficult>0</difficult>
		<bndbox>
			<xmin>547</xmin>
			<ymin>195</ymin>
			<xmax>640</xmax>
			<ymax>295</ymax>
		</bndbox>
	</object>
	<object>
		<name>RBC</name>
		<pose>Unspecified</pose>
		<truncated>0</truncated>
		<difficult>0</difficult>
		<bndbox>
			<xmin>388</xmin>
			<ymin>11</ymin>
			<xmax>481</xmax>
			<ymax>111</ymax>
		</bndbox>
	</object>
	<object>
		<name>RBC</name>
		<pose>Unspecified</pose>
		<truncated>0</truncated>
		<difficult>0</difficult>
		<bndbox>
			<xmin>171</xmin>
			<ymin>175</ymin>
			<xmax>264</xmax>
			<ymax>275</ymax>
		</bndbox>
	</object>
	<object>
		<name>RBC</name>
		<pose>Unspecified</pose>
		<truncated>1</truncated>
		<difficult>0</difficult>
		<bndbox>
			<xmin>260</xmin>
			<ymin>1</ymin>
			<xmax>374</xmax>
			<ymax>83</ymax>
		</bndbox>
	</object>
	<object>
		<name>RBC</name>
		<pose>Unspecified</pose>
		<truncated>0</truncated>
		<difficult>0</difficult>
		<bndbox>
			<xmin>229</xmin>
			<ymin>91</ymin>
			<xmax>343</xmax>
			<ymax>174</ymax>
		</bndbox>
	</object>
	<object>
		<name>RBC</name>
		<pose>Unspecified</pose>
		<truncated>0</truncated>
		<difficult>0</difficult>
		<bndbox>
			<xmin>69</xmin>
			<ymin>144</ymin>
			<xmax>184</xmax>
			<ymax>235</ymax>
		</bndbox>
	</object>
	<object>
		<name>RBC</name>
		<pose>Unspecified</pose>
		<truncated>0</truncated>
		<difficult>0</difficult>
		<bndbox>
			<xmin>482</xmin>
			<ymin>131</ymin>
			<xmax>594</xmax>
			<ymax>230</ymax>
		</bndbox>
	</object>
	<object>
		<name>RBC</name>
		<pose>Unspecified</pose>
		<truncated>0</truncated>
		<difficult>0</difficult>
		<bndbox>
			<xmin>368</xmin>
			<ymin>89</ymin>
			<xmax>464</xmax>
			<ymax>176</ymax>
		</bndbox>
	</object>
</annotation>
Annotated Image:
Each object’s label is in the <name> tag and its corresponding location is represented by the tags <xmin>, <ymin>, <xmax>, <ymax>. This is called Pascal VOC. But to train images with Darknet and YOLOV3, the annotations should be in YOLO format. There is a project on github which can be used to convert annotations from Pascal VOC to YOLO format - https://github.com/ssaru/convert2Yolo . As we want our model to detect only WBCs; RBCs and Platelets should be omitted from the annotations. So, some custom changes should be made to that project to achieve this task. Instead, you can download the YOLO format annoatations directly from here https://github.com/DatascienceAuthority/Bloodcells-Detection-YOLOV3/tree/master/annotations-yolo
During conversion of annotations, another .txt file is generated which has locations of all the images. I have excluded few images (408, 409, 410) so that they can be used to test the trained model. So, there are train.txt and test.txt files.
train.txt - https://gist.github.com/DatascienceAuthority/4c980e45501639a1d067eabb6f4e1352
test.txt - https://gist.github.com/DatascienceAuthority/1505ab8bcf1e291177f04cdc2e6763b7
Move all the train images and annotations to same folder in your Google Drive and correct the locations in train.txt using a text editor.
WBC.names
Create *.names file which consists of class name to detect. In our case, only one class (WBC)
WBChttps://gist.github.com/DatascienceAuthority/c3641fd2f1277ebea76e9b143c6b8a76
WBC-obj.data
Create *.data file which consist of locations of other files or folders
Gist: https://gist.github.com/DatascienceAuthority/a8624a789e3235c1da2a8af8f29bf353
classes = 1 train = /content/drive/My\ Drive/Projects/BCCD/train_annotations_yolo/train.txt valid = /content/drive/My\ Drive/Projects/BCCD/test_annotations_yolo/test.txt names = /content/drive/My\ Drive/Projects/BCCD/WBC.names backup = /content/drive/My\ Drive/Projects/darknet_bloodcells/backup/train, valid, names are the files we created above and backup is the location where the trained model will be saved. The model is saved for every 100 steps (Processing of 1 batch of images i.e batch size is 1 step. Note that the ‘My Drive’ is written as ‘My\ Drive’ in the above file but it is written as ‘My Drive’ in annotation files.
Configuration file (.cfg)
The original yolo is trained on ImageNet data which has many number of classes. Here, we will be training our model to detect only WBCs, so we need to create a custom configuration file.
Original yolov3.cfg
https://gist.github.com/DatascienceAuthority/6dab60a98f650dc234b6957b2ab20623
yolo_custom.cfg
We should change the batch and subdivisions based on the memory available. Change the classes in all the [yolo] layers to 1 as we are training the model for 1 class (WBC). Above all the [yolo] layers, change the number of filters in the [convolution layer] to 3*(classes+5). The number 3 is the number of masks in the [yolo] layer, classes is the number of classes to detect and the number 5 is due to the parameters in prediction output (center_x, center_y, width, height, confidence). To be specific, create a copy of the configuration file, rename it to yolo_custom.cfg and make the following changes.
Line 6: batch=64
Line 7: subdivisions=64
Line 603, 689, 776: filters=18
Line 610, 696, 783: classes=1
Optionally, you can change the width and height (line 8 and 9) to increase resolution.
The new configuration file after making the above changes
Gist: https://gist.github.com/DatascienceAuthority/9cb763a57f58c7e5fd9726ff9d9f23b5
Install Darknet
Create a new python notebook in Google Colab and clone the darknet repository from github and setup darknet. The original darknet repository is at https://github.com/pjreddie/darknet but there is another darknet implementation which is suitable for Google Colab https://github.com/kriyeng/darknet/. The Google Drive folder structure includes a space “My Drive” which will raise an error if we use original implementation and it is handled by the git branch ‘feature/google-colab’ in this version of darknet.
!git clone https://github.com/kriyeng/darknet/
%cd darknet
!git checkout feature/google-colab
Compile Darknet
!make
Download Pre-Trained Darknet Weights!wget https://pjreddie.com/media/files/darknet53.conv.74
File LocationsUpload the files created above to your Google Drive and save their locations in variables
objdata = '/content/drive/My Drive/Projects/BCCD/WBC-obj.data'
yolov3cfg = '/content/drive/My Drive/Projects/BCCD/yolo_custom.cfg'
preweights = '/content/darknet/darknet53.conv.74'
Mount Drive
Authenticate so that Colab can access the files uploaded to drive
from google.colab import drive
drive.mount('/content/drive')
Train the model
!./darknet detector train '$objdata' '$yolov3cfg' '$preweights' -dont_showTraining will take few hours, it took about 6 hours for me and I stopped training after 1000 steps and the loss is about 0.3. The training weights will be saved for every 100 steps at the location specified (backup).
Start training from last saved weights
saved_weights = '/content/drive/My Drive/Projects/darknet_bloodcells/backup/yolo_custom_last.weights'
!./darknet detector train '$objdata' '$yolov3cfg' '$saved_weights' -dont_show
Predicting with trained model
%matplotlib inline
import matplotlib.pyplot as plt
import numpy as np
import cv2
import pandas as pd
from matplotlib import patches

objdata = '/content/drive/My Drive/Projects/BCCD/WBC-obj.data'
yolov3cfg = '/content/drive/My Drive/Projects/BCCD/yolo_custom.cfg'
saved_weights = '/content/drive/My Drive/Projects/darknet_bloodcells/backup/yolo_custom_last.weights'

def PredictandShow(image_loc):
  original_img = cv2.imread(image_loc)
  original_img = cv2.cvtColor(original_img, cv2.COLOR_BGR2RGB)
  result = !./darknet detector test '$objdata' 'yolov3cfg' 'saved_weights' '$image_loc' -dont_show
  confidence = ''
  if(('WBC' in result[-1]) & ('%' in result[-1])):
    confidence = result[-1]
  fig, ax = plt.subplots(nrows=1, ncols=2, figsize=(20, 10))
  newImage = cv2.imread('predictions.jpg')
  new_img = cv2.cvtColor(newImage, cv2.COLOR_BGR2RGB)
  ax[0].imshow(original_img)
  ax[0].axis('off')
  ax[1].imshow(new_img)
  ax[1].axis('off')
  ax[1].set_title(confidence, fontsize=30, color="green")
Let us see how the model detects on an image that is not used during training
PredictandShow('/content/drive/My Drive/Projects/fast-rcnn/BCCD/test_images/BloodImage_00410.jpg')Output
On the left is the original image and on the right is the predicted image. The model is predicting WBC with 97% confidence. The difference in the original bounding box and predicted bounding box can be seen below
GitHub: https://github.com/DatascienceAuthority/Bloodcells-Detection-YOLOV3
Original Data: https://github.com/Shenggan/BCCD_Dataset
Colab Notebook: https://colab.research.google.com/drive/1E2kM1M63DlYhbe4z--jg0cF6My8EQDbS